

Luxury vinyl floors work as the best transformers in your home renovation. Vinyl floors are tough yet look so great. One magical thing about luxury vinyl flooring is its DIY installation. Perhaps the most comfortable flooring you will ever find in the flooring market. Below are some tips and tricks that will help you in vinyl floors installation over the preexisting concrete floor.
Luxury vinyl is one of the hot-selling materials in the flooring market. The main reason behind its installation in any home is due to its basic beneficial features such as durability and affordability. Vinyl floors can be laid down over any other flooring. However, the concrete floor is regarded as an excellent underlayment for luxury vinyl flooring.
Any concrete subfloor usually requires the least preparation time. A concrete subfloor is leveled first. Waterproof vinyl floor serves as a barrier, and hence there are no chances of moisture penetration. For sound insulation, you can also use plywood and any other insulation material that will be able to provide you more comfort.
Let’s begin with the essential tips to install luxury vinyl over a concrete subfloor without adding any more thing
Materials Required
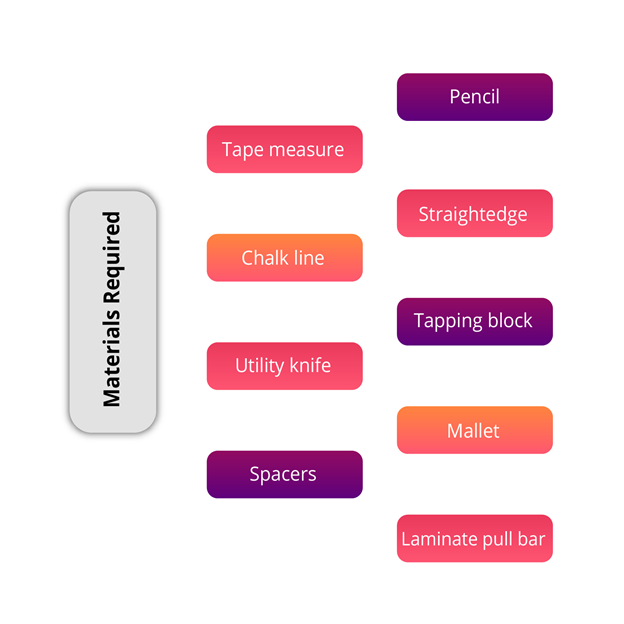
For proper installation, you need some materials for floor preparation
- Air hose
- Aviation snips
- Air compressors
- Nail gun
- Sander
- Chalk
- A cold chisel
- Hammer
- Dust mask
- Hearing equipment
- Some knee pads for protection
- Knife
- Glasses
- Tape measure
- Knife
Any other material as per requirement and nature of the floor.
Luxury vinyl floor is available in the form of sheets, planks, and tiles. Each has a different installation mechanism, but all can be used over the main concrete subfloor to add to your interest. Luxury vinyl is highly durable and comes with a shallow price tag. It can easily fit in your budget. You can quickly get long vinyl planks or vinyl rolls, aka vinyl sheets, from any flooring store.
Suppose you are still confused, then don’t worry. Follow the trend. Around the world, vinyl sheets and vinyl rolls are commonly used. Anyhow for a more premium look such as hardwood or stone, you can also use vinyl planks.
Successfully installing floors demands proper planning work with exact measurements in addition to correct materials. Proper floor preparation before installation of hardwood tiles and vinyl on concrete will produce a durable finish along with a smooth surface.
Our reputable professionals offer a stress-free floor installation experience for all Columbus search requests.
Given below are some steps that you need to follow as much as you can. These tips and tricks will help you, resulting in a professional appearance.
Preparation before Vinyl Flooring
Note: Always Keep In Mind
- Vinyl is highly flexible. You can separate the luxury vinyl sheet if mistakenly placed over an uneven floor.
- If you need more proper installation, first grind the high spots and make the floor equal.
- Fill the left spots with concrete based compounds.
- Vinyl sheets are known as bathroom vinyl flooring because they are highly resistant to moisture.
By following all these steps, you can quickly get one a proper subfloor ready for vinyl placement.
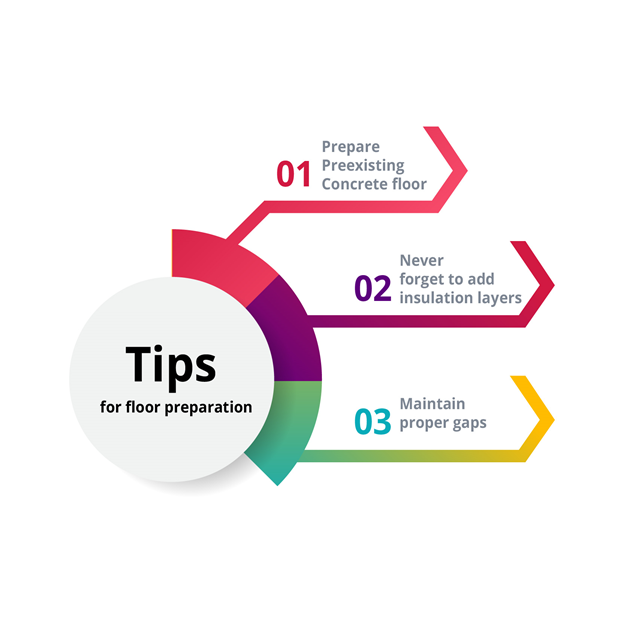
Tip No 1: prepare preexisting concrete floor
Recently laid down concrete floors are prone to release some off-gases and water vapors. Such floors need more than 150 days or almost 3v months for complete dry out. Unless and until this flooring is not ready, it cannot accept the new floor. Luxury vinyl is resilient. White vinyl floor works greatly in living rooms. You can now find Columbus flooring city . To know the detailed process Read now How to install luxury vinyl plank flooring?
Waterproof vinyl flooring has some rigid cores and does not release any off-gases. However, if the subfloor is not prepared correctly, there are chances that molds and other microorganisms grow beneath due to moisture residue. In glue as an adhesive material, excessive moisture will damage the sticking and cause the floor lifting.
According to Armstrong, flooring water vapors should not exceed a particular limit of 5 pounds per 1000 square feet in one day. Depending on adhesive water vapors amount may increase from 8-12 pounds per thousand square feet. Always ask the company or salesperson before buying luxury vinyl planks? So that your floor may not get mutilation. Vinyl Flooring Guide is important to know about it.
Tip No 2: Never Forget To Add Insulation Layers
Indeed, the friendliest way to have good insulation is to add some cork or felt between the two floors. You have three basic choices
- Add some cork or any other thermal insulation material over the concrete, and then place the vinyl floor.
- Place a plastic sheet as a moisture barrier over the underlayment. Undoubtedly it will word as a tremendous insulating coat. Adding a plastic sheet is cost-friendly and does not expand the whole procedure.
- Add some sleeper joists or plywood to have an enhanced comfort level and smooth walk. This might be a bit expensive, but it fits in your comfort zone. These layers will work as the best material and eventually make the floor release moisture from the deepest layer.
Consider taking suggestions from some professionals. In the case of plywood, your floor height rises, and it might be a big problem later on. Vinyl floors are usually heated susceptible. You can place the vinyl sheets in heat areas without exceeding the recommended heat. Grey vinyl floors are considered as 2020 leading vinyl color.
These are all the instructions for the recently poured concrete subfloor. Conversely, if the subfloor is old and completely dry, you may not need any protective backing or insulation material.
Tip No 3: Maintain Proper Gaps
Perhaps you have to remove the baseboard first and then replace it after the vinyl flooring installation. Unquestionably this is an impracticable approach. Make a proper plan first. Try leaving a ¼ inch expansion gap or follow the quarter round molding process. The expansion gap is mandatory to prevent buckling of the floor.
Read Top 10 mistakes while installing luxury vinyl flooring .
For proper placement of luxury vinyl plank flooring over the concrete floor, there are specific essential considerations
- First of all, take proper measurements and make sure that you have enough flooring.
- For having an idea in a more precise way, measuring the area in square feet adds ten percent. Divide the figure by total square feet in a box. Now buy these total no of boxes.
- Always buy some extra flooring because some will be wasted in cutting and other processes.
- Proper acclimatization is necessary. Give your unpacked flooring at least 48 hours to get acclimatized.
- For more uniformity, you can mix the planks in different boxes before placing them.
- Always follow instructions mentioned on the flooring guide
Now your floor preparation is complete. Let’s move towards vinyl flooring installation
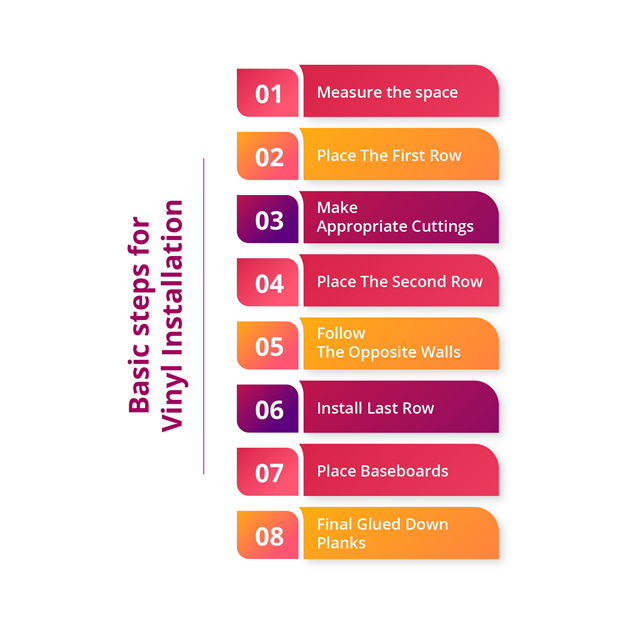
There Are Some Basic Steps
- Measure The Space
- Place The First Row
- Make Appropriate Cuttings
- Place The Second Row
- Follow The Opposite Walls
- Install the Last Row
- Place Baseboards
- Final Glued Down Planks
1. Measure the Space
All rooms are not square in shape. You can prepare the floor. For this purpose, consider taking some professional help. Take measurements with the help of tape. Select those walls from where you want to place the first row. Measure lengths and widths appropriately. You can also use a calculator or seek some professional help. Draw lines with the help of chalk.
2. Place the First Row
Cut down the tongues from vinyl planks. With the help of a utility knife and place the planks in an end to end pattern. Snap all the ends in the same pattern. It might be possible that the last vinyl plank is short enough or by a figure of 6 inches. Try maintaining a gap between the walls and the first row to have a proper expansion gap.
3. Make Appropriate Cuttings
There is no need to borrow a say for vinyl floor cutting. For having a proper cutting, you can make a line. Sketch with the help of a pencil. Cut all the indentations and curves with the help of the utility knife.
After properly cutting the vinyl plank, you can now place it for a realistic look.
4. Place the Second Row
Start from the offcut point of the first row and now place the second row. To have more stability, follow the 6 inches space. Stagger this space for proper stand by. Vinyl is a flexible material. Made from inorganic compounds, vinyl has some useful properties. One of the easiest ways for vinyl floor installation is by snapping. Make an end to end snaps. You can use a mallet for snapping vinyl planks
5. Follow The Opposite Walls
Continue the installation process in the same way. Follow again 6 inches stagger pattern. Cut all the end curves and notches to have a symmetrical pattern. The staggered pattern should be random. Now follow the opposite walls and place luxury vinyl planks.
6. Install The Last Row
When the room isn’t square, it’s ideal for cutting and introducing the last column board by board instead of cutting all the boards without an instant’s delay. Measure the hole from one finish of the main board to the next, add 1/4 inch, draw a line on the board and cut along the line with a blade. Introduce the board utilizing a cover pull bar to draw it against the one close to it. Utilize a similar strategy to introduce all the boards in the last column
7. Place Baseboards
Use baseboard material that is sufficiently wide to cover the holes. On the off chance that they are more extensive than 3/4 creeps because of the room being incredibly out of square, you may need to augment standard 3/4-inch baseboards with quarter-round foot forming. Make assured to nail the baseboards to the divider and the foot trim to the baseboards. Try not to nail or paste anything to the floor or the boards. Where flooring won’t have the option to move, and the floor may clasp.
8. Final Glued Down Planks
The technique for introducing glued down vinyl planks is indistinguishable from that for introducing click-lock boards. Yet, instead of snapping the boards together, you eliminate the protection from the glued strips, put the boards together, and push down to seal the cement. The main thing to recall is trying not to get dust on the glued down strip after eliminating the backing. Residue keeps the glue from moving away, and the boards will lift.
After all the boards are made sure, roll the floor with a story roller to press the boards into the glue and forestall bubbles and lift them. Now you are done. Wait for 48 hours and then freely walk over the luxury vinyl floor.
Vinyl Flooring on Concrete: What You Need to Know
The choice of vinyl flooring for concrete surfaces stands out because of its durability alongside water resistance and inexpensive nature. A proper preparation process reduces the risk of moisture damage and uneven surfaces from developing in the future when installing vinyl flooring on concrete.
Steps to Install Vinyl Flooring on Concrete:
Clean and Level the Surface: Remove dust, dirt, and debris. A self-leveling compound provides an essential layer which should be used when desired.
The installation requires a moisture barrier because water damage prevention is essential.
The installation method for vinyl can be achieved through glue-down or floating or peel-and-stick methods.
The vinyl flooring installation requires following the manufacturer’s direction for smooth installation results.
Sealing the edges around the floor helps stop moisture from penetrating while also increasing its lifetime expectancy.
A vinyl floor installation on concrete surfaces provides modern appearance together with reduced maintenance demands along with affordable alternatives to hardwood or tile.
Conclusion
Luxury vinyl floors are the homeowners first choice. Now you don’t have to wait for a more extended period. The need to hire professionals is also eliminated. Peel-stick and click –lock installations have made the whole process easy and time-saving. Read the post above to complete how you can install luxury vinyl floors over concrete.
Frequently Asked Questions

1. Can Luxury Vinyl Be Installed Over Existing Concrete Floor?
Yes with proper planning and preparation of the underlying concrete floor you can install luxury vinyl.
2. What Are The Necessary Preparations Before Putting Luxury Vinyl Over Concrete Floor?
Luxury vinyl is easily installed over concrete that is prepared for at least 60 days before final work. Never place with the help of glue if the concrete floor is uneven and where moisture can cause a problem. Start preparation at least before 2 months.
3. What Type Of Adhesive Should I Use?
There are certain type of adhesive materials that you can use
- Double sided tapes
- Glue
- Acrylic adhesives
4. Is There Any Underlayment Required Before Vinyl Flooring Installation?
Vinyl floors can be bonded directly with the floor. Using adhesives and other glue down materials. There is not any requirement for sublayment.
5. Can I Replace Damage Vinyl?
Yes you can replace damaged pieces of luxury vinyl flooring. However it’s costly because it’s quite tricky and needs some professionals for more appropriate installation.
6. How do you lay vinyl flooring on concrete?
The first step for installing vinyl flooring on concrete consists of cleaning and smoothing the surface while filling all cracks before allowing it to dry completely. After measurement and vinyl cutting the installation process can be done by loose-lay or with double-sided tape or glue-down methods. Apply strong pressure to the vinyl before cutting its edges while the adhesive needs time to cure.